
Properly mounting a red dot sight plays a critical role in ensuring accuracy and stability. Studies from Norwich University highlight that red dot sights significantly enhance precision, especially when aiming for center mass, compared to iron sights. Similarly, reports from the National Law Enforcement Firearms Instructors Association reveal improved hit ratios during officer-involved shootings when these sights are mounted securely on a rail. A well-mounted red dot not only boosts reliability but also builds confidence for users across various skill levels.
Key Takeaways
- Use the correct tools to mount a red dot sight. You need a torque wrench, proper screwdrivers, and thread-locking glue for a tight fit.
- Always focus on safety before mounting the red dot. Make sure the gun is unloaded and work in a bright, quiet place.
- Place the red dot correctly on the Picatinny rail. Line it up with the rail’s numbers and check eye distance for comfortable aiming.
Tools and Preparation
Essential Tools for Mounting a Red Dot
Proper tools are essential for securely mounting a red dot sight on a Picatinny rail. Using the right equipment ensures stability and prevents damage to the firearm or optic. Below is a list of recommended tools:
- A torque wrench, ideally set to 10-13 inch-pounds, for precise tightening.
- Screwdrivers or Allen keys that match the screws of your red dot sight.
- Thread-locking compound, such as Loctite 222 (purple), to secure screws without damaging the optic.
- Cleaning supplies, including alcohol pads, a soft brush, and a microfiber cloth, to clean the rail and screws.
- Adapter plates and hardware, if required for compatibility with your firearm.
These tools help achieve a secure and accurate mount, reducing the risk of misalignment or loosening during use.
Safety Tips Before Starting
Safety should always be the top priority when working with firearms. Before mounting a red dot sight, follow these critical steps:
- Ensure the firearm is unloaded. Remove the magazine and clear the chamber to confirm no ammunition is present.
- Use a safe workspace. Choose a well-lit, stable surface away from distractions.
- Wear safety gear. Protective eyewear can shield against accidental debris or chemical splashes.
- Inspect the firearm and optic. Check for any damage or debris that could interfere with the mounting process.
- Follow the manufacturer’s instructions. Refer to the user manuals for both the firearm and the red dot sight to ensure proper installation.
Taking these precautions minimizes risks and ensures a smooth and safe mounting process.
Mounting the Red Dot

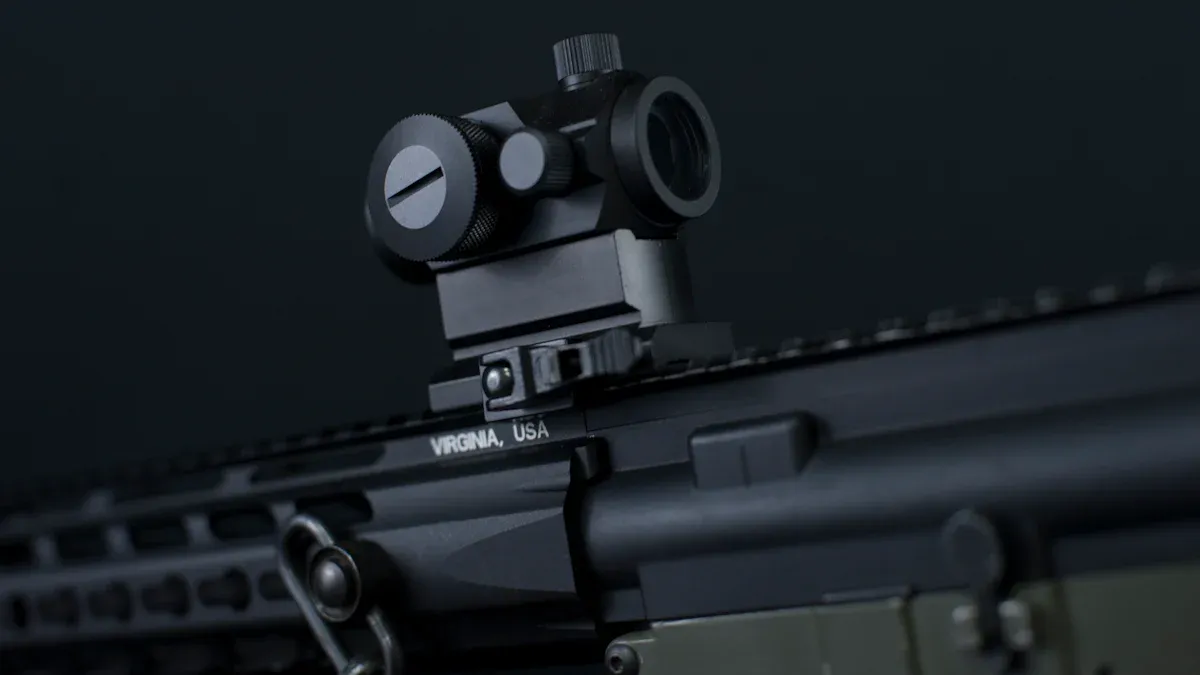
Positioning the Red Dot on the Picatinny Rail
Proper positioning of the red dot on the Picatinny rail is essential for achieving optimal performance. The Picatinny rail, known for its versatility, allows users to attach various accessories, including optics, bipods, and lasers. To position the red dot correctly:
- Start with the rail’s numbering system: Most Picatinny rails feature numbered slots. These markings help users consistently reattach the optic in the same position after removal, ensuring the point of impact remains unchanged.
- Consider eye relief and shooting stance: Place the red dot far enough forward to avoid interference with peripheral vision but close enough to maintain a natural shooting posture.
- Ensure compatibility: Some firearms may require adapter plates to mount the red dot securely. Always verify that the optic aligns with the rail system.
The alignment of the red dot with the weapon remains consistent regardless of the shooter’s position. This feature enhances rapid target acquisition and accuracy, making it a preferred choice for both tactical and recreational shooters.
Securing the Red Dot with Proper Torque
Securing the red dot with the correct torque ensures stability and prevents the optic from shifting during use. Follow these steps for a secure installation:
- Prepare the mounting surfaces: Clean and degrease the rail and screws using alcohol pads. This removes debris and ensures a solid connection.
- Apply threadlocker: Use a small amount of blue threadlocker on the screws to prevent loosening. Allow it to cure for 24 hours before using the firearm.
- Use a torque wrench: Tighten the screws to the manufacturer’s specified torque, typically between 10-13 inch-pounds. Over-tightening can damage the optic, while under-tightening may lead to instability.
During installation, check the level of the optic to ensure it sits evenly on the rail. Regularly inspect the screws and mounting hardware to maintain a secure fit over time.
Ensuring Alignment with the Rail
Proper alignment between the red dot and the rail system is critical for accuracy and ease of use. A well-aligned red dot simplifies aiming by eliminating the need for traditional sight alignment. To achieve this:
- Focus on consistent positioning: Maintain a steady head and eye position behind the optic. This consistency ensures the point of aim matches the point of impact.
- Utilize quick-detach mounts: Many red dot sights come with quick-detach mounts, allowing users to switch optics easily while preserving alignment.
- Zero the optic: Adjust the red dot so that it aligns perfectly with the firearm’s barrel. This step ensures that shots land precisely where intended.
By focusing on the dot instead of iron sights, shooters can enhance target acquisition and movement efficiency. Proper alignment also allows for quicker shot deployment, which is especially beneficial in high-pressure scenarios.
Sighting In the Red Dot

Adjusting Windage and Elevation
Properly adjusting windage and elevation is essential for aligning the red dot with the firearm’s point of impact. These adjustments ensure that the optic compensates for environmental factors and shooting conditions.
- Understand the adjustment controls: Most red dot sights feature two dials—one for windage (horizontal adjustment) and another for elevation (vertical adjustment). These dials are often marked with directional arrows to indicate the adjustment direction.
- Start with a stable setup: Secure the firearm on a bench rest or shooting vise to eliminate movement during adjustments. This stability ensures accurate calibration.
- Make incremental changes: Fire a test group of three shots at a target. Observe the point of impact and adjust the windage and elevation dials in small increments until the red dot aligns with the center of the group.
Tip: Refer to the optic’s user manual for specific adjustment values. Many red dot sights use a "click" system, where each click corresponds to a specific measurement (e.g., 1/2 MOA or 1/4 MOA).
The comparative study on red dot sight parallax highlights the importance of precise adjustments. By measuring aiming dot deviation due to inconsistent head positions, the study emphasized the need for accurate windage and elevation settings. This ensures that the red dot remains consistent across various shooting angles, improving overall performance.
Verifying Accuracy at the Range
Verifying accuracy at the range is a critical step after mounting and adjusting the red dot. This process confirms that the optic is properly zeroed and performs reliably under real-world conditions.
- Begin with boresighting: Start by aligning the red dot with the firearm’s bore at a close distance, such as 25 yards. This step provides a baseline for further adjustments.
- Test at multiple distances: Incrementally extend the shooting distance to your desired zero range, typically 50 or 100 yards for most applications.
- Assess accuracy with group shooting: Fire 3- or 5-shot groups at various points on the target to evaluate consistency. For example, shoot at each corner of the target to form a square. This method helps identify any deviations in accuracy.
Note: Range tests conducted with red dot sights have shown that inexperienced shooters may initially struggle with dot acquisition. However, performance improves significantly with practice and training.
The data from these tests underscores the importance of verifying accuracy after mounting a red dot. Consistent range practice ensures that the optic performs as expected, even under varying conditions.
Fine-Tuning for Optimal Performance
Fine-tuning the red dot ensures peak performance and reliability. This step involves refining the optic’s settings and adapting it to the shooter’s preferences and shooting environment.
- Reassess alignment: After initial adjustments, recheck the red dot’s alignment with the firearm’s barrel. Small deviations can occur during the mounting process or after firing multiple rounds.
- Account for environmental factors: Wind, lighting, and target distance can affect performance. Adjust the brightness of the red dot to match ambient light conditions, ensuring visibility without excessive glare.
- Incorporate training drills: Practice dynamic shooting scenarios to test the red dot’s performance under different conditions. Drills such as rapid target transitions and shooting from unconventional positions help identify areas for improvement.
Pro Tip: Use quick-detach mounts to switch between optics without losing zero. This feature allows shooters to adapt to different scenarios while maintaining accuracy.
The findings from USPSA classifiers reveal that red dot sights offer a slight advantage in hit factors, particularly for experienced shooters. However, consistent practice and fine-tuning are necessary to fully realize these benefits.
Properly mounting a red dot sight ensures accuracy and builds confidence. A securely mounted optic enhances shooting performance and reliability.
- Tested under extreme conditions, red dot sights maintained functionality after freezing, drops, and exposure to mud.
- Stability and accuracy depend on a quality mount and sufficient training.
Regular practice and double-checking the setup maximize these benefits.
FAQ
How do I know if my red dot is securely mounted?
Check for any movement by applying light pressure to the optic. A properly mounted red dot should remain stable and aligned with the rail.
Can I mount a red dot without a torque wrench?
Yes, but it is not recommended. A torque wrench ensures precise tightening, preventing damage to the optic or rail caused by over- or under-tightening.
What is the ideal distance for zeroing a red dot sight?
Most shooters prefer zeroing at 50 or 100 yards. This range provides a balance between close-quarters accuracy and long-range precision for various shooting scenarios.
Tip: Always refer to the manufacturer’s guidelines for specific mounting and zeroing recommendations.
Post time: Apr-30-2025